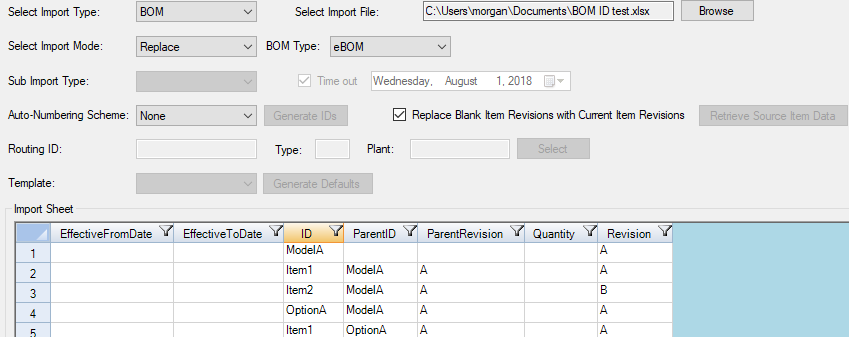
Clicking on the Import Data icon ![]() opens the data import editor. Entering data is a very important step in the Assembly Planner process. This is where information enters the database via a spreadsheet file (e.g. Excel). There are different types of files that can be imported, and each type has different data field and format requirements. To import a file, it must be selected via the browse button. Data can also be copied and pasted directly into the import editor spreadsheet.
opens the data import editor. Entering data is a very important step in the Assembly Planner process. This is where information enters the database via a spreadsheet file (e.g. Excel). There are different types of files that can be imported, and each type has different data field and format requirements. To import a file, it must be selected via the browse button. Data can also be copied and pasted directly into the import editor spreadsheet.
Important: Before you are able to import data, a default plant must be set.
Important: All column headers in the import file should have a corresponding field in Assembly Planner. A mismatch in the column header of the import file and the Assembly Planner custom field names or a missing custom field will prevent data from being loaded. Before importing, please make sure that all necessary custom fields have been created, and all headers match the standard fields.
Make sure the file is saved as an .xls file and is closed before attempting to import the file into Assembly Planner.
Import Options

Import Data Menu
Select Import Type
In the Import Options section, you can Select Import Type. The drop-down menu allows three different types of data to be imported:
•Item is a flat file that deals with specific items (parts/components). Each unique ID number will be imported as its own entity.
•BOM (Bill of Materials) is a structured list that shows how items are interrelated. A BOM file reflects the relationship between parent and child items (like an exploded BOM).
•Resource is for tools, equipment, and fixtures that need to be tracked in Assembly Planner.
•Consumption is used to specify which activities consume which items.
•ProcessResource is used to map resources to activities that use the resources.
•Process allows you to create routings and activities en masse.
•ProcessStructure allows you to create operations and activities within operations en masse.
•Worksteps allows you to import worksteps into activities en masse.
See the sub-sections for more information.
Select Import Mode
When importing either items or resources, you need to specify the import mode. The drop-down menu provides two choices:
•Add New for items or resources that are new to the system. The program will not allow you to "Add New" items with identification numbers that match existing items.
•Merge allows you to update fields on existing items and import the changes. This means if the ID already exists in the database, the existing properties of that entity will be replaced with the properties in the import file.
BOM imports are automatically set to Merge, and the Import Mode cannot be changed. Also, if you attempt to update fields for existing IDs and import the data under the Add New mode, an error message will appear. For updates, the mode must be Merge.
Please see each Import Type's details for additional information about how the different import modes work.
BOM Type
When importing a Bill of Materials (BOM), the BOM type needs to be selected. The drop down menu gives two choices:
•eBOM, or engineering Bill of Materials
•mBOM, or manufacturing Bill of Materials
Auto-Numbering Scheme
If an auto-numbering scheme has been created for the selected entity (this must be done before any data is entered into the database), the scheme can be selected from the drop down menu. Then the Generate IDs button will generate IDs for any row in the spreadsheet (this will ensure that values are unique). This feature is available for items, BOMs, and activities.
Replace Blank Item Revisions with Current Item Revisions
If you are unsure of the current item revision of an item you're going to import, you can let Assembly Planner determine it. If the Import Mode is Add New and you leave the Revision field blank, Assembly Planner will assign the first available revision to the item. If the Import Mode is Merge and you leave the Revision field blank, Assembly Planner will find the current revision and update its properties with the data you import.
Routing ID, Type, and Plant
If you select the Consumption or ProcessResource Import Type, you will need to select a routing to tell Assembly Planner where the activities in your import file belong.
Select Import File
•Clicking the Browse button allows you to look through folders for the upload file. Note: The file you upload must be in .xls format and the file must be closed before importing. If you try to import a different file format or an open file, you will see a blank import sheet, which means no data will be imported.
The Import Worksheet

Import Data Worksheet
Spreadsheet view
The bottom of the Import Data editor is in a spreadsheet format. After an import file has been selected, the information contained in the import file will be displayed in the spreadsheet. This is a preview of the data that will be imported.
Import button
This is the button that actually loads the import file into Assembly Planner. When the data has been imported successfully, a window will pop up saying that the import was successful. If the system finds any errors in the sheet, it will throw an error specifying the issue(s) and affected row(s), and the row(s) will then be highlighted in red so you can fix them before trying to import again. No data will be imported until all errors are fixed.