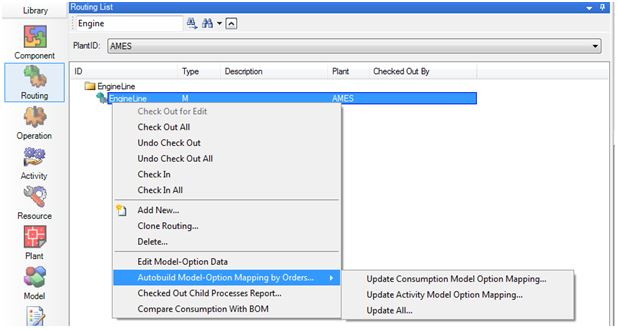
The routing list helps users navigate through the Routing Editor, showing a tree structure with the routings. The routing list is arranged as a list of folders containing routings; when the folder is open, clicking on a routing selects that routing. The routing list provides easy reference to the routings by displaying the ID, Type, and Description of each routing. Each routing has a unique ID, and any user-entered description about the routing is shown in the third column. The fourth column specifies which plant uses the routing. More detailed information about the selected Routing Header is shown in the header on the right side of the Assembly Planner user interface.

Routing Search List displaying EngineLine Routing
Right-clicking inside the Routing List (in the large white space below the search control) will display the routing menu. Options on the menu include:
•Check Out and Check in Options: Refer to Check Out and Check In for all relevant menu options
•Add New: Adds a new routing. A window will launch where routing information can be entered. Note: You must right-click in the white space of the Routing Search List for the Add New function to be enabled.
•Clone Routing: Adds a new routing identical to the one selected. You can choose whether the cloned routing references existing activities (using all the exact same activities) or creates copies of the activities with the same properties. You can also choose whether to copy local properties and/or process ownership into the cloned routing.
| When giving the new routing an ID, you can manually type an ID or use the search control (click on the ellipses button to the right of the ID box) to search for a component ID. The latter would typically make sense if you were cloning or creating a machining-based routing. In either case, the ID of the new routing can match the ID of an existing routing, but the Types must be different. |
•Delete: Permanently deletes the routing. This will affect your ability to use other data that had been associated to the routing.
For example:
oA Line Balance scenario using the deleted routing will still exist, but you be unable to successfully refresh the data or apply the scenario, generate the the Work Instructions report, or generate the FMEA report in Line Balancing.
oThe Work Instructions associated to the routing will no longer be available in the Work Instructions module.
oAny PFMEAs that had been associated with the activities under the routing will no longer be available in the PFMEA module.
oFor those using the Shop Floor Viewer portion of the application: Data on the Shop Floor database will not be affected, but the data will no longer be available to republish or update.
•View Model-Option Data: (visible when routing is checked in): Displays how the models and options are associated with tasks for this particular routing.
•Edit Model-Option Data: (visible when routing is checked out): Displays and allows for editing the model and option associations with tasks for this particular routing. See Mapping Models and Options to Activities and Mapping via the Routing for more information.
•Autobuild Model-Option Mapping by Orders: (shown in the image above) This is the recommended method for mapping models and options. For details, please refer to Automatic Model-Option Mapping.
•Autobuild Model Mapping by Parent Component: This is a routine only to be used by a limited number of clients with a specific system setup. See Automatic Model-Option Mapping.
•Autobuild Model-Option Mapping by BOM: This method is used to map models and options to Activities based on the BOM. For details, please refer to Automatic Model-Option Mapping.
•Checked Out Child Processes Report: Reports all currently checked out items and processes under the routing.
•Compare Consumption with BOM: This report compares the parts consumed by the routing with the parts specified in the BOM. To do this, select the "activity" radio button. Click "Add" and browse for the BOM parent and select the parent item. Then click Run Report.