In Assembly Planner, "Resource" is a term that applies to any tool or fixture. A client can choose to monitor only major resources, all resources on one line, or all resources in the plant; Assembly Planner does not limit the number of resources allowed. The following concepts explain how Assembly Planner handles resources.
Defining Resources
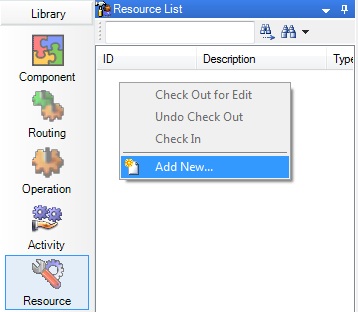
You can define and edit resources and the data associated with each of them within the Resource Editor. Resource data can be entered manually or can be imported. To add a new resource, right-click in the Resource List and enter the Resource ID, Name, and Description. The last two fields are optional, but the Resource ID is required.

Resource Editor Search List right-click menu highlighting the Add New function
A detailed explanation of how to import resource data can be found in the Import Resources tutorial.
Mapping Resources
Assembly Planner allows resources to be mapped to either stations or specific tasks. If a task needs a specific tool, the association step tells Assembly Planner the task must have said tool. This helps during the Line Balance, because you will see flags if the tool is unavailable at the station where the task is assigned. Mapping resources to tasks occurs in the Activity Editor.
Mapping a resource to a station tells Assembly Planner where tools and fixtures are currently located. This will eventually help inform you where the resources need to be moved once a new line balance has been performed. The most important resource-to-station mapping relates to monumental resources.
Monumental Resources
Tracking monumental resources, resources that cannot be moved or are otherwise fixed to a particular workstation, is especially important. Examples include a pit in the floor or a fixture anchored to the floor. Both of these are resources that would be difficult (and expensive) to move as part of a standard line balance; it is desirable to tie these resources to workstations and flag them as monumental. This ensures Assembly Planner knows they need to stay in the same place.
A monumental resource should first be defined and mapped just like other resources. You can then designate resources as monumental in the Line Balancing module. An explanation of how to do this can be found in Line Balancing Constraints.
Resource Classes
Another concept in the discussion of resources is the concept of resource classes. A resource class is a user-created general category describing the type of tool. All resources have unique IDs. The class allows you to group similar resources. For example, if three screw guns (SG01, SG02, SG03) exist, Assembly Planner sees these as unique, dissimilar entities until a "Screw gun" class is created and all three guns are added to it. When the class is created, you can associate a class, rather than a specific tool, to a process. During a line balance, Assembly Planner will look for a tool of the correct class instead of looking for an individual member of the class.
To create a resource class from the Resource Editor, go to Tools and select the 'Resource Class Library' option. A window where resource classes can be created or edited will open.