Line balancing constraints are those that limit where and when tasks can be performed during the assembly process. Most constraints are set up in the data library, outside of the line balancing module.
Precedence is the dependency between tasks. Defining precedence defines the order in which tasks can be, or must be, completed. In any assembly process, there are many tasks that could be performed in parallel, while there are others that must be performed in series. Defining precedence is required if you intend to use the automatic line balance tool.
*Note: Unlike the other constraints, precedence is always considered and followed. When running the default balance, the precedence will never be violated.
Below is a summary, for more details on using the Precedence tools, follow the link below and select Precedence Tab.
How to Set Up Precedence
1.Go to the Library and click on the Routing Editor.
2.Search for, select, open, and Check Out All on the routing whose precedence you wish to edit.
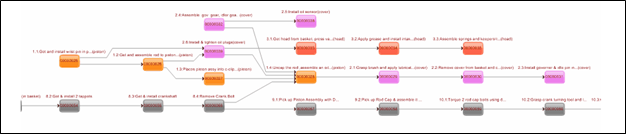
3.Click on the Routing's Graph tab.
4.Decide what of the following assumptions would work better when creating the task precedence network.
a.If you would like to assume that all tasks could be performed in parallel, and start adding in series dependencies, there are no steps to take at this point.
b.If you would like to assume that all tasks could be performed in series, click on the Default Precedence button on the right side of the toolbar you see. This will create what we call a "straight-line precedence." This means that the entire assembly process must be performed in the order in which the activities are currently defined.
*Note: The activities in the Sheet View are sorted by the OpSeqNo and ActSeqNo of each operation and activity in the routing, so you see all of the activities in the first operation, sorted by ActSeqNo, then you see all the activities in the second operation, sorted by ActSeqNo, and so on.
5.Decide whether you want to use the Sheet View or the Graph View to edit the precedence. You do not have to choose one or the other; you can switch back and forth as you like. See below for details on how to edit precedence using either view.
•Using the Sheet View
1.Add a precedence dependency by entering a row number value in the Precedence cell of an activity. That value should be the row number(s) of the activity (or activities) which must precede the selected activity. If an activity has multiple predecessors, enter the row numbers of the predecessors in a comma-separated list.
2.Remove a precedence dependency by deleting a row number value from the Precedence cell of an activity.
•Using the Graph View
1.Making sure Edit Mode is turned on in the toolbar, add a precedence dependency by hovering the mouse to the middle of a task node until the cursor turns to a hand. Click and hold, then drag your cursor to the next desired node. If an activity has multiple predecessors or successors, it may have multiple lines going to and from it.
2.Making sure Edit Mode is still turned on in the toolbar, remove a precedence dependency by clicking on a precedence arrow/arc and hitting the Delete key on your keyboard.
Other Tips to Using the Graph View (Toolbar Buttons)
•The Find button allows you to search by activity ID, Description, or Work Zone. Use the same search logic as you would in the rest of the software. When you select an activity from the Results pane, it will center the graph view around the selected activity.
•You can zoom many different ways. You can use the 4 magnifying glass zoom buttons in the toolbar, or you can use your mouse's scroll function to zoom in or out of a particular area. You can also switch from Edit Mode to Zoom Mode and highlight the area you wish to zoom in on. Switch to Pan Mode if you want to keep the zoom level the same, but pan across the graph.
•Once you have made some changes to the graph, you can reset the graph so the nodes are laid out in an orderly fashion by clicking on the Auto Layout button.
•Once you have made some changes to the graph, you can check your work by clicking the Check Cycle button (red check mark) to make sure there are no circular precedence loops.
•The Re-sequence button will reset the ActSeqNo for all activities in the Routing, based on the current precedence. You may select how you want the sequencing to occur, and with what increment.
•You can save an image of the precedence graph or print it directly from the application. The images saved or printed will be whatever you have on the screen, not necessarily the entire chart.
For more details on these Toolbar Buttons, see the Routing editor's Graph tab section of this manual.
Precedence Violations
In the Line Balancing Module you will be able to see if there are interoperator precedence violations. This will let you know if there is a violation with different tasks being preformed at the same station.
If there is a violation a green square with a P in the middle will appear.
Example: ActSeqNo 30.01 has a precedence set so that it must be preformed after ActSeqNo 30. Since it is currently set to to be preformed before it instead of after the green square showed up. This means that there is a precedence violation.

Station Details
You can manually move tasks around to fix a precedence violation. If you are editing a scenario and manually move a task around that creates a new violation a green square will show up to tell you it's a violation.
Running an automated line balance or algorithm in the module should not create new precedence violations.
Monumental Resources are the tools and equipment that are fixed to the station which they are located, and that would be expensive or difficult to move. If a task requires a monumental resource, it should be assigned to the same station where that resource is located.
*Note: While you can map all resources to their appropriate work centers, it is only necessary to map the monumental resources to their work centers.
How to Set Up and Turn On Monumental Resource Constraints:

Monumental Resource
1.Make sure the resource(s) exist(s) in the Resource library.
2.Map resource(s) to an activity's Resource tab in Activity Editor.
3.Map resource(s) to Work Center in Resources column of Plant Module.*
4.After you have created and opened the line balance scenario, go to Edit>Monumental Resources and check the box(es) next to the monumental resource(s).
5.When you run the Default Balance, check the Monumental Resources constraint prior to running the balance.
Work Zones are used as a way to constrain work to certain locations or to certain operators. Assigning a work zone to a task means that task has to be performed in a station that has that work zone, and/or to an operator who has been assigned to that work zones.
How to Set Up and Turn On Work Zone Constraints:

Work Zone Constraints
Keep the following in mind:
•You can name work zones however you'd like, but be consistent. If you use 'Right' and 'R' they will be considered to be two different work zones.
•Work zones are not case sensitive. Right, right, and RIGHT would all be considered to be one work zone.
1.If an activity must be performed in a particular work zone, define the work zone in the Work Zone cell of that activity in the Operation Editor's Activity List. If a task requires multiple work zones, separate them with a plus sign (e.g. Right+Front). If a task can be performed in one work zone or the other (but doesn't require both), separate them with a comma (Right, Front).
2.Define the work zone(s) for each station in the Work Zones column in the Plant Editor. If the station consists of multiple work zones, separate them with a comma (Right, Front, Left, Rear). If a Station has no Work Zone defined, by default it will assume it has All Work Zones.
3.When you create your scenario, set the Line Type on the first page of the wizard to "Multi-sided." If you're using an existing scenario, you can change the setting from "Single-sided" to "Multi-sided" by going to File>Scenario Details.
4.After you've created your scenario, if you have multiple operators working in the same station, and certain operators can only work in certain work zones, go to File>Edit Operator Details and edit the Operator Work Zone column for each operator.
*Note: If you define Operator Work Zones, you must first define Station Work Zones. You can't have an operator with a Right work zone if he's working in a station with a Right work zone.
5.When you run the Default Balance, check the Work Zones constraint prior to running the balance.
Task Groups are used to force tasks to be performed together. If there are certain tasks that need to be performed in the same station or by the same operator, you can group them, so if one task in the group is moved, all tasks in the group are moved.
How to Set Up and Turn On Task Group Constraints:
Keep the following in mind:
•You can name task groups however you'd like, but be consistent. If you use "Wheel Install" and "WheelInstall" and "wheel install" they will be considered to be three different task groups.
•Task groups are case sensitive.
•There are two types of task groups (Station and Operator), and two places to edit Task Groups (data library and Line Balancing scenario).
1. If a set of activities should be performed as part of a group, define the same task group to each activity in the Group ID cell in the Operation Editor's Activity List.

Operation Editor's Activity List
2. After you've created your scenario, you can define what type of group to use. If you only have one operator per station, you can use just Station Groups. If you have multiple operators per station, you need to decide which group(s) must be performed in a single station but potentially split across operators (Station Group) and which group(s) must actually be performed by a single operator (Operator Group).
a.If using Station Groups, there is no need to take further action if you've created groups per Step 1.
b.If using Operator Groups, go to Edit>Task Grouping. Select the group's header row, right click and select Edit Group. Check the 'Assign group to a single operator' box and click OK.
3. If you wish to edit, add, or remove groups once your scenario is created, you may do so by going to Edit>Task Grouping.
a.To add a task to a group, right click on the task's row, right click, and select Add to Group. You can either create a new group or add it to an existing group.
b.To move a task from one group to another, right click on the task's row, right click, and select Change Group.
c.To remove a task from a group, right click on the task's row, right click, and select Remove from Group.
d.If you wish to remove a group, right click on the group's header row, and select Remove Group. This will move the tasks inside that group to the Ungrouped Tasks list; it will not delete the tasks themselves.

Task Grouping
4. When you run the Default Balance, check the Task Groups constraint prior to running the balance.
Inspection Groups are used to force tasks to be performed in different stations. If there are certain tasks that need to be performed in different stations, you can make them part of an inspection group. Though the actual reason for wanting to keep tasks separate is irrelevant, this constraint was originally named for cases where in-line inspections are occurring, and the operator that completes an assembly task should not be the one who performs the official inspection of that assembly task.
How to Set Up and Turn On Inspection Group Constraints:
1. If a set of activities should not be performed in the same station, define the inspection group, following the logic below, for each activity in the Inspection ID cell in the Operation Editor's Activity List.
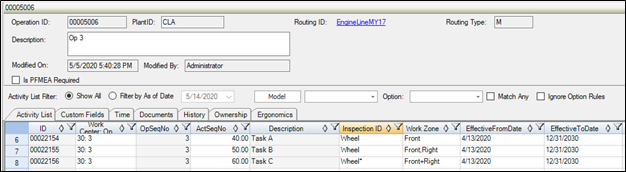
An asterisk (*) is used to identify the inspection task in the group, or the one that cannot be assigned with the other tasks. Consider the seven tasks below and their Inspection IDs:
Task |
Inspection ID |
001 |
Heat Pump* |
002 |
Heat Pump |
003 |
Starter* |
004 |
Starter* |
005 |
Cover |
006 |
Cover |
007 |
Cover* |
Tasks 001 and 002 are not allowed in the same station. Tasks 003 and 004 are not allowed in the same station. Tasks 005 and 006 are allowed in the same station, but neither is allowed in the same station as Task 007.
2. When you run the Default Balance, check the Inspection constraint prior to running to balance.