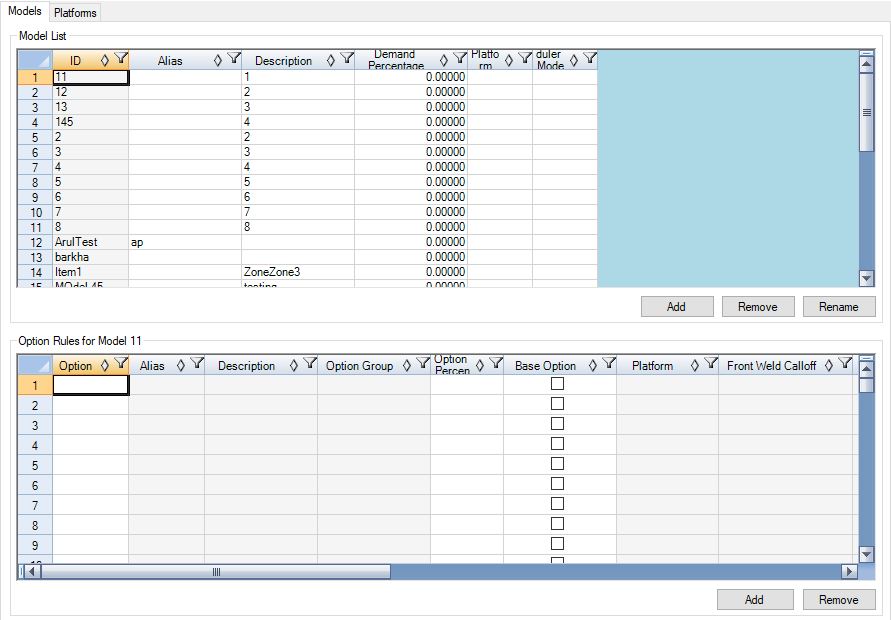
Clicking on the model button ![]() opens the Model Editor. You can define and manage models in the Model Editor. Once created, models can be mapped to activities.
opens the Model Editor. You can define and manage models in the Model Editor. Once created, models can be mapped to activities.
Model List
The model list shows the ID and description of all models in the system. Add, Remove, and Rename buttons are at the bottom of the screen's model list portion, by which models may be added, removed, or edited. Refer to Add Parent Components as Models to learn how to add multiple models at once.

Model Tab in the Model Editor
Model-Option Rules
Model-option rules specify which options can possibly occur with a given model. For example, the chair example introduced in the Models and Options section has three different coverings for the chairs produced: cloth, leather, and vinyl. However, for an expensive model like the executive, a vinyl covering is not allowed. In that case, only cloth and vinyl would appear in the Option Rules for the executive model.
The lower half of the Model Editor screen displays the model-option rules for the selected model. The model-option rules should be entered after the options have been created in the Option Editor.
The options in the Option Rules list are identified by the Option, Description, Option Group, and Group Code columns. (See the Option Editor for details of these fields.)
The Percentage column indicates the penetration percentage of the option, or the percentage of units of this model for which this option is included. This percentage can first be defined when the option is created in the Option Editor. This percentage will appear in the Percentage column of the Option Rules list when the option is added to the Option Rules for each model. If the percentage varies in a particular model, it can be changed in the Option Rules list for that model. The defined percentage will be brought into a new scenario in which the model is included.
If the checkbox in the Base Option column is checked, it indicates the option is always part of the selected model, which essentially makes it a part of the model. For companies that do not define model-based BOMs and only use option-based BOMs, this allows them to indicate what is "base" or "standard." Depending on system preferences, this field may be used to generate summary reports. For most users, this field is for information purposes only.
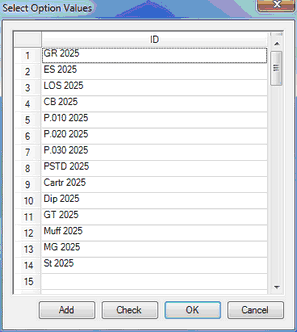
The Add and Rename buttons at the bottom of the model-option rules section allow the model-option rules to be edited or cleared. Choosing "Add/Remove" will bring up the window shown below which contains a spreadsheet for Option IDs and a series of buttons.
You can remove options from the list by clearing the ID cell. You can add options to the list by either manually typing the ID in a blank cell or using the 'Add' button. If you manually type the ID, click the 'Check' button when you have finished, so the system can validate the Option ID exists in the Option Editor. Assembly Planner will reject the manual entry if it does not match an Option ID in the database. If you use the 'Add' button, a search window will appear, so you can search and add existing Option IDs. The % search string will return all entries; a list of the other valid wild cards can be found in the Wildcards section of this manual.

Add/Remove Option Rules input window
Platforms
The Platforms tab is the second tab in the Model Editor. You can use the Platforms tab to associate entities to an end item. An end item BOM can be configured within Platforms by defining the platform and which models, options, items, and finish types are associated to the item.
Typically, companies using Assembly Planner have BOMs configured with models and options. Currently, the platform system is for information purposes only, but it can be further developed for companies who do not have model and option configured BOMs. Please Contact Your Proplanner Representative to discuss this topic further.