Precedence graphs are very important in Assembly Planner; they are used to show dependencies and define the order tasks must be completed. Also, line balances are based upon precedence. When defining precedence, you determine tasks performed in series (one after the other) and in parallel (groups of tasks performed in any order).
There are two views: the Graph View, which shows a diagram with nodes representing the activities, and the Sheet View, which shows a spreadsheet listing all of the activities. Making changes in either view will automatically update these changes in the other view. For step-by-step instructions to define precedence, see the Create the Precedence Graph tutorial. For an explanation of additional features within the Graph View, see the following screenshots and definitions below.
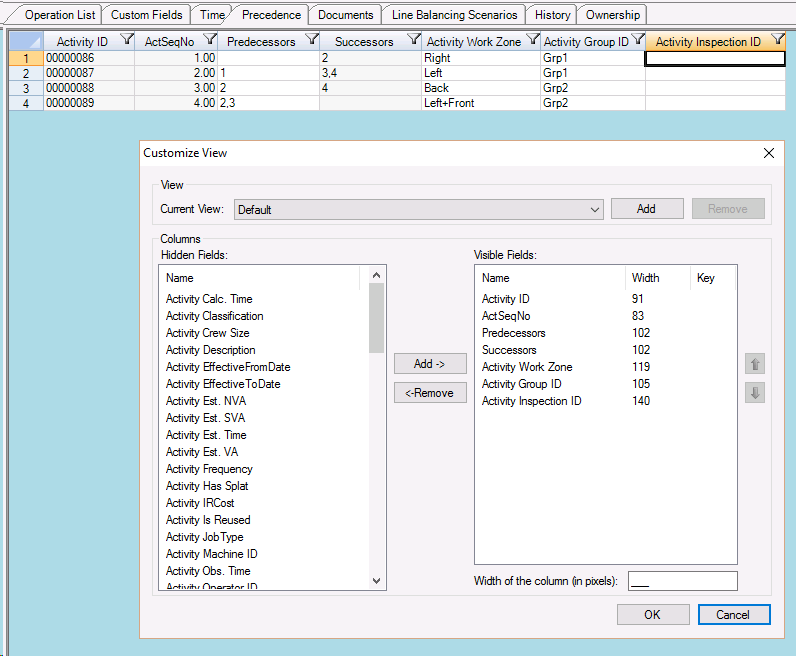
Sheet View:
Routing Precedence Sheet View
Sheet View Features
The Sheet View contains the following features:
1. Directly edit, including pasting over multiple rows, the Predecessors field.
2. Customize View, including the ability to see all Operation and Activity level fields for the process through the right-click menu.
3. Basic filter on each field.
4. Editing of the Activity Work Zones, Group, and Inspection ID.
5. Automatic calculation of the Activity Successors field.
6. View Activity Details through the right-click menu on any individual row.
Viewing Task Details
Double-clicking on a specific task tile will display the Activity's properties window. This window is read only, but it gives a quick reference for the specific task by showing the models, options, work steps, resources, and consumption associated to the task. Also if there is an image or video associated with it at the activity level, then you can view them in the same window.

Activity/Task Details Window
Graph View:

Routing Precedence Graph View
Graph View Features
The graph view has extra control features. Please review this section to familiarize yourself with the functions of the improved control.
Precedence Graph Toolbar (Above Routing Header)
Export to Image ![]()
The ![]() icon exports the graph as a picture. From there, the picture can be saved or printed. To export the graph as a picture:
icon exports the graph as a picture. From there, the picture can be saved or printed. To export the graph as a picture:
Click on the icon. Then specify a file name and choose the image file format.

Export Image Interface
Print Graph ![]()
Three controls are involved in printing the precedence graph: Print Settings, Print Preview, and Print.
Print Settings ![]()
Click on the Print Settings icon shown above. You can choose to print the entire graph or the current display (view of the graph on the screen). You can also set the scale for the page to any magnitude.
You may also use the Advanced Options to change the print margins or page layout.
If you wish to plot this on a plotter: select the Entire Graph – Set Margins and select the paper size from Advanced Options.

Precedence Graph Print Settings Window
Print Preview and Print ![]()
The print preview displays the graph based on the page settings. You can either print from the print preview control or click on the print icon.
If the print preview is showing the graph on multiple pages, but you only want it on one page, check the print settings. Changing the scale on the print settings can bring the graph into one page. Alternatively, change the zoom level on the graph to fit the contents into one page. The clarity of the graph will depend on your print settings and the complexity of your precedence graph.
Find... ![]()
The precedence graph find control pulls up a list of activities matching the search criteria. Three search parameters are available: activity ID, activity description, and activity work zone. You can enter search terms in any or all of these areas; using more parameters results in a narrower search and a shorter results list.
The wildcard % sign can be used, but the other wildcards cannot be used. The % wildcard is allowed at both the beginning and end of the search term, just the end of the search term, or just the beginning of the search term (e.g. %Get%, Get% and %Get).

Interface to allow users to find operations in the precedence graph
Clicking on an entry in the list will visually display the selected activity, zooming in to the surrounding area.

Selecting an activity in the find control will zoom to that activity in the precedence graph
The search control was designed for users with large routings. Previously, visually looking at all the nodes in the graph and finding the correct nodes to connect was time-consuming. With the find control, you can search for the predecessor and following tasks and connect the nodes.
To use the find control to connect nodes, find and click on the predecessor in the list. Assembly Planner will zoom to the correct area.
Click and hold on the graph in the center of the node. Drag the arrow outside of the node and release the click. Then use the advanced find to search for and select the second activity from the list. Assembly Planner will zoom to the second activity selected from the search list. Click on the center of the node of the second activity to set the precedence.
Within the search control, the Color Coding dropdown determines how the nodes will be colored based on one of three grouping options: Work Zone, Group, and Operator/Operation.
Zoom Controls ![]()
You may select Zoom in, Zoom out, Zoom normal, and Fit Contents. Additionally, moving the mouse wheel will also zoom in and out of the graph.
Modes
![]()
The precedence graph has three modes: Edit Mode, Zoom Mode, and Pan Mode, and each mode is described below. To switch between modes, you can
1) click on the mode in the toolbar
2) right click in the graph area and select a mode
3) use keyboard shortcuts (Alt+d = Edit Mode, Alt+z = Zoom Mode, Alt+p = Pan Mode).
Edit Mode
To enable Edit Mode, you must Check Out All processes under a routing. In order for edit mode to be enabled, no processes under the routing can be Checked Out by other users when the Check Out All is called.
In Edit Mode, arcs can be drawn, and the task nodes can be moved.
To draw arcs, left click and hold on the 'from' node and release the click at the 'to' node.

Drawing a precedence arc from one operation to another uisng the edit mode in the graph tab
To delete arcs, left click on the arc to be deleted and hit the delete key on the keyboard.
To move nodes, left click on the node to select it. Wait for the move pointer ![]() . Click on and move the node.
. Click on and move the node.
Note: You can also draw a crossing window across the nodes and move multiple nodes at a time. The same can be done for moving and deleting multiple arcs at a time.
Zoom Mode
While in zoom mode, click and drag a box around an area to zoom into that area. The graph cannot be edited in zoom mode; if you wish to draw or delete arcs, switch to edit mode.
Pan Mode
Pan mode enables the graph to be moved around (panned) with the mouse. The graph cannot be edited in pan mode; if you wish to draw or delete arcs, switch to edit mode.
Auto Layout ![]()
Auto Layout redraws the graph in an organized manner. You can use this function while drawing the precedence graph to refresh the view and display the graph in a more coherent drawing.
Default Precedence ![]()
Default Precedence will create a Straight-Line Precedence. The tasks will be ordered consecutively as they appear in the sheet view list.
Check Cycle ![]()
This feature provides an easy check for cycles in the graph. Clicking the button will check for circular precedence and highlight any arcs causing problems. It will also check the sheet view for any errors that result in a cycle.
Additionally, Assembly Planner automatically checks for cycles when you attempt to save, and you will not be allowed to save if cycles exist. (The application saves just before you change tabs or leave the editor. Therefore, if the precedence contains a cycle, you cannot leave the Routing Editor or the Graph tab until it is resolved.) If a cycle exists, an error message similar to the one below will appear and a precedence line in the cycle will be highlighted. Note: the highlighted line may not be the line you want to delete, but it will be part of the cycle.

Warning saying the precedence graph contains a cycle
Re-Sequence Activities ![]()
This feature allows you to change the ActSeqNo for the Activities based on the precedence graph. This may change the order of the Activities within their Operations. When you click on the icon, the window shown below appears, allowing you to determine how you want the precedence to drive the ActSeqNo's.

Re-Sequence Activities window
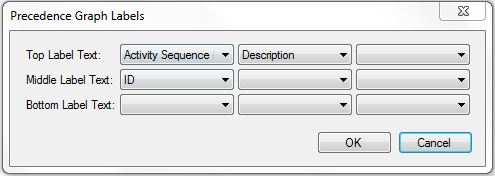
Labels ![]()
This feature allows you to determine the labels appearing above, centered, and below the Activity nodes.
Color Coding:
In Graph View, color coding will be enabled and shown in each activity depending on what Work Zone each activity is mapped to. In the diagram below, there are a few activities that show this color coding where four work zones are being referenced. Note that any activity not mapped to a work zone will be in gray and given an unassigned work zone. To map an activity to a work zone, simply click on the Operation editor icon and under the Activity List tab scroll over to the Work Zone column. You will be able to assign the activity to an existing work zone or to a new one by selecting one in the drop-down menu or by typing in a new one respectively.

Color Coding in Graph View