Manually Assigning/Re-Assigning Tasks
In module chart:
Tasks can manually be assigned in the main line balancing chart to stations and operators by dragging and dropping or using a right click menu.
Drag & Drop
| To manually drag and drop a task from one station to another, you can select the task in the Station Details sheet, click and hold the task, as you move the cursor, it will change to an arrow with a box around its tail. Drag the task directly over an existing station bar in the chart view, or the station label. When the task is placed, the Task Assignment Preview screen will appear. Multiple tasks can be moved at once using common multi-select options. Shift+click will select the first task, last task and all tasks in between. Ctrl+click will select individual tasks not in a consecutive group. |

Move Stations in the Station Details Sheet
The Task Assignment Preview screen will summarize the tasks being reassigned, the target Station and Operator, before and after Time analysis, and Scenario Violation impact.
There is no undo function when moving tasks, however you may identify the Previous Station in the Station Detail section below the chart.

Task Assignment Preview
Assignment Settings:
Consider Task Grouping: If the task(s) selected has a Task Grouping ID, then selecting this option will automatically move grouped tasks to the station Target Station Operator that is selected. If left unchecked, only the selected tasks will be reassigned (*note this may create a Group violation).
Assign All Activities with same station and operator properties: Selecting this option will automatically include all tasks that share the same station and operator assignment, essentially moving all tasks. If left unchecked, only the selected tasks will be reassigned.

Assignment Settings
Select Station and Operator: All Stations and Operators in the scenario are shown here, the target station identified from using drag and drop will be highlighted, however a different station or operator may be selected at this time. The chart also displays the current violation count by type and selecting different stations will adjust the count in real time.

Selecting Station and Operator
Assign Tasks: the selected task will be listed in this section,

Assigning Tasks
Assignment Analysis: This table summarizes the time of the selected tasks, current time for the selected Operator and the change in time for the selected operator after the assignment. Both Weighted and Net times are shown, which is bases off the scenario take rates based on the LB preferences. The Weighted time column should be considered more when balancing to the overall average time of the operator, and the Net time should be considered when balancing to the worst case cycle time.
Scenario Violations: This table summarizes the count of violations, by type (Precedence, Monumental Resource, Resource, Groups, Work Zones, and Inspections), for the entire scenario before the reassignment and after. The count can be used to measure if the task assignment is overall improving the balance or worsen the balance with regards to constraint violations. Some constraints should be considered more carefully such as Precedence and Monumental Resources, which can be more difficult to overcome, whereas a task group or Resource violation may be more easily removed.

Scenario Violations
Right Click Menu

Right-Click on Station to get a List of Options
Change Assignment: To manually move a task from one station or operator to another, you can select the task in the Station Details sheet, then right click and select Change Assignment. The window that appears will show you a preview of the current and future station time, and allows you to select the Station and the Operator to which you wish to move the task. If you wish to move more than one task at a time, you can select more than one row, then right click and proceed in the same manner.
Remove Assignment: If you wish to remove the task, select Remove Assignment and the task(s) will be moved to the Unassigned List.
Lock to Station: Selecting this option will Fix the task to the current assignment, the checkbox under the Fixed column will be checked. Locking a task to a station will warn users when attempting to move these tasks from the current assignment, however fixed tasks can still be reassigned. Fixed tasks will not be moved during an Auto Balance.

Change Assignmnet Message
Unlock from Station: This will unlock the selected task(s) from the station and remove all restrictions pertaining to fixed tasks
Move: To re-sequence a task within a station, select Move and one of the following options
Move to Beginning - sequence task to top of the list
Move Up/Move Down – shift a task up or down
Move to End – sequence task to bottom of the list
Cut and Insert – cut and select precise row to insert task to, adjacent tasks will shift down

Move Options
Unassigned List: If you wish to move tasks from the Unassigned List to a station or operator, you can select the task(s) in the Unassigned List, right click, and select Assign to Station. Then choose your station and operator.
*Note: You can manually move any task to any station or operator you wish. While doing so, you may violate existing constraints that have been set up. If this is the case, you will see a flag in one of the Violations columns in the Station Details sheet.
In Yamazumi Chart:

Yamazumi Chart
Tasks can manually be moved in the Yamazumi chart from one station or operator to another by dragging and dropping.
Click once on the task tile you wish to move. Then click and hold, while dragging your cursor, and the tile, into the label box of the station to which you're moving the task.
If you wish to move more than one task tile at once, you can Ctrl+Click to select more than one tile, even if they're from different stations, then drag and drop into the new station.
If you wish to specify which operator within a station to move a task, switch the Chart Type to Model Chart - Operator View before moving the tile(s).
*Note: You will not be warned of constraint violations until closing the Yamazumi chart view and returning to the main line balancing chart.
Using the Default Balance
To let Assembly Planner's algorithms auto-assign tasks based on the criteria you set, go to Actions>Default Balance.
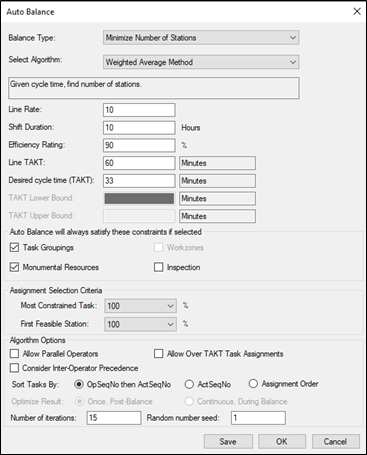
1.Select a Balance Type.
1.Minimize Number of Stations: This will balance the line to the specified TAKT time, while minimizing the number of stations required to do so.
2.Minimize Cycle Time: This will balance the line to utilize the specified number of stations, while minimizing the TAKT time required to do so.
3.Minimize Number of Operators: This will not change the task-station assignments, but instead will adjust the number of operators required to meet the new specified TAKT time. Share Operators may be created during the balance.
A shared operator is an operator who can work in multiple stations, as long as the operator's total working time does NOT exceed the TAKT. This means that, if TAKT time is 20 minutes, and the operator only has 10 minutes of work he/she can perform in one station (due to other constraints), he/she can move to another station and potentially perform another 10 minutes of work in that station. Shared operators are often used in cases where there are tasks that require a helper, or in combination with work zones, where only certain operators are allowed to work on the top of a vehicle, for example. This balance type will create Shared Operators if necessary, but you can also define shared operators in the Edit>Operation Details window.
2.Select an Algorithm.
•Single Model Method: This is the only option for single model balances.
•Weighted Average Method: This will find a balance in which some models' work content in some stations may fall above TAKT time, but the weighted average work content for all models in the work station will meet or fall below TAKT time. This algorithm will yield more efficient balances, but the operating principle of allowing some units to stay in a station longer than TAKT may not always be feasible.
•Peak Model Method: This will find a balance in which no model's assigned work content in any station will exceed TAKT time. This is typically used on a moving assembly line, where a unit cannot and will not stay in a station longer than TAKT. .
3.Set the takt/station inputs.
If you have selected the 1st or 3rd algorithm, you can either set the Desired cycle time (TAKT) or you can set the Line Rate, Shift Duration, Efficiency Rating, and Line TAKT to have the Desired cycle time (TAKT) calculated for you.
•Line Rate: Number of units produced per shift.
•Shift Duration (in hours): Length of time operators are working on production (shift length minus breaks).
•Efficiency Rating: Expected efficiency of the line (%).
•Line TAKT: TAKT, before efficiency is applied. This is calculated based on the first two inputs (Line Rate * Shift Duration).
•Desired cycle time (TAKT): The value the algorithm will target for final TAKT time. This can either be manually entered or calculated using the previous inputs (Line TAKT * Efficiency Rating).
If you have selected the 2nd algorithm, define the Number of stations desired, as well as the TAKT Lower Bound and Upper Bound. The bounds give the algorithm a starting point; it will run until it find the lowest TAKT feasible with the given number of stations.
•Number of stations: Number of stations you want to use.
•TAKT Lower Bound: Low value estimate of the possible TAKT time.
•TAKT Upper Bound: High value estimate of the possible TAKT time.
4.Set the constraints to consider. You can choose to turn on any or none of the enabled constraints. Some scenarios and some algorithms may disable certain constraints. See the Line Balancing Constraints section to ensure you've properly set up each constraint you want to be considered. Remember that precedence will always be considered and followed. If you check the box of any other constraint(s), any balance the algorithms present will have followed those constraints. If conflicting constraints have been set up, you get a message that a balance is not feasible.
5.Set the Assignment Selection Criteria. Most users leave these at the default settings, but you can consider adding randomness to the line balancing algorithm by changing the "Most Constrained Task" and the "First Feasible Station" parameters. The lower the percentage of each is, the more randomness is considered in the algorithm, and the higher the probability is that you will get a better solution, but the computation will take longer.
6.Set the Algorithm Options.
•Allow Parallel Operators: This enables a special type of balance and requires a clear understanding before using.
Parallel Operators represents a production philosophy that rotates operators between stations to accommodate tasks or task groups that exceed TAKT time.
If the Parallel Operators box is checked, N cross station operators will be used in the station with the maximum cycle time (i.e., TAKT) under the following two conditions: (1) the longest task time in this station accounts for more than (N-1) / N x 100% of the TAKT, (2) after using the parallel operators, the cycle time of this station is still the largest cycle time among all the stations (i.e., TAKT).
By adding N parallel operators, the TAKT can be reduced by (N-1) / N x 100%.
For example, if station A has a 9-min task and a 2-min task, and station B has a 3-min task, after you check the parallel operator box, there will be three cross station operators in station A and the new TAKT will be (9 min+2 min) / 3 operators= 3.67 minutes per operator. Each parallel operator will first finish the process of the 2-minute task and then process the 9-minute task for 1.67 minutes in station A. Since the TAKT has been reached, the parallel operator will finish the rest of the 7.33-min of work in another two stations. After that, the parallel operator will go back to station A and start another cycle. All the 3 parallel operators are identical in terms of this process.
•Sort Tasks By: This determines how the activities will be sorted within a station, either by considering the original OpSeqNo and ActSeqNo combination of each activity in the routing, or by ActSeqNo alone.
•Optimize Result: This lets you determine how long the algorithm should run to find a balance.
Selecting Once, Post-Balance will stop the algorithm after the first feasible balance that meets all requirements is found.
Selecting Continuous, During Balance will allow the algorithm to continue running after the first feasible balance is found, to try to find a more optimized balance.
*Note: while the balance is running, you can click the Stop button at any point to see the best balance the algorithm has found at that point.
•Number of iterations: This refers to how many times the algorithm is performed before a final result is displayed. Most users will be satisfied to leave this number at the default setting.
If you are unsatisfied with the current balancing solution, increasing the number of iterations may help improve the solution. Remember that increasing the number of iterations will increase the time it takes for the balance to complete.
If you have a complex scenario that takes an excessively long time to display results, or one that goes into a loop while solving, you may want to try decreasing the number of iterations. As the complexity of a scenario grows, it becomes more and more difficult to find an acceptable solution; while the program is looking for a solution, you wait. If you expect the algorithm to process the data multiple times (with several iterations), you will wait even longer. If you decrease the number of iterations, you may get a result more quickly. If you decrease the number of iterations and the program still has trouble finding a solution, you need to reevaluate your scenario, because the combination of the activities, constraints and precedence are too complicated. You will need to relax the constraints, simplify the precedence, or remove some activities.
•Random number seed: This is the initial number used by the algorithm's random number generator; you may try to change the seed to get different balancing solutions.
7.Click OK and allow the balance to run.
Removing Assignments, Stations, and Operators
To run any of these routines, go to the Actions menu and select the desired routine.
Remove All Assignments:
This clears all the task assignments, and all the tasks are moved to the unassigned list in the collapsible tab on the left side of the screen. The graph view shows empty stations and operators.
Remove Empty Stations:
This removes stations with no tasks assigned to them from the graph view and the scenario.
Remove Empty Operators:
This removes operators with no tasks assigned to them from the graph view and the scenario.