For step-by-step directions and an example, see the tutorial.
To create a new Sequence Planner study, go to File and select 'New Study'. The Sequence Planner Wizard consists of three simple windows: Study Details, Order Details, and Station Details. The four buttons found at the bottom of the frame allow you to navigate through the Sequence Planner Wizard. "Next" will advance one frame if all required information is filled in on the current frame. If required information is missing, an error message will appear when you click Next. "Back" allows you to review previous pages and make changes before creating the study. "Cancel" will exit the wizard. "Finish" creates the study, but the button is not activated until all necessary information has been entered in all frames.
Any information entered in the wizard can later be changed using the edit menu. You have the option to edit Study Details, Order Details, and Station Details after the study has been created.
Study Details
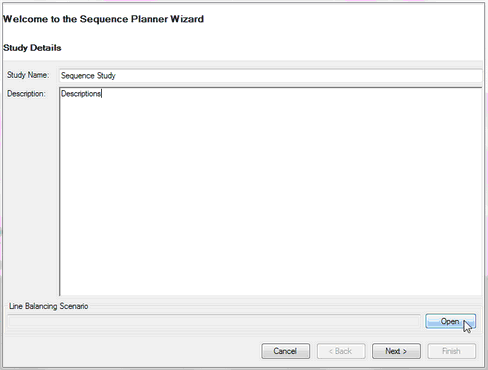
The first frame of the Sequence Planner Wizard is where you specify study details, such as the name of the study, a description, and the line balancing scenario to be used.

Study Details
•Study Name: You can name the study as you wish. Special characters, numbers and spaces are allowed. Study names can also be changed later with the Study Details Editor.
•Description: This section provides space for you to provide fairly detailed notes describing the study if you choose.
•Line Balancing Scenario: The Line Balance that will be used for this particular sequence study is specified here. All saved studies are displayed in the Scenario Manager when you click "Open".
A click on the name of the line balance scenario selects it. "Open" tells the Sequence Planner Wizard to use the selected scenario.
Order Details
If you used a schedule-driven line balance with a spreadsheet order file to create the study, the orders will automatically appear in this window.
When Fetch orders from schedule database is selected
•Schedule Dates: Checking the single-day study box automatically sets the schedule to one work day. (The length of one work day is specified in Tools=>Options=>Sequencing.) For studies covering more than one work day, dates can be selected from the drop-down calendars.
•Assembly Line: A specific assembly line must be selected.
•Get Orders From Build List only: Causes the get orders button to return only build list items and not all orders present.
•Get Orders: This retrieves the orders from the database for the dates specified.
When load orders from excel file is selected
•Select Excel File: Allows an external excel file containing orders to be loaded, as long as it is in the specified format.
In either case
•Spreadsheet section: This displays information about the retrieved orders.
| If a row is clicked on (selected), the three buttons at the right of the spreadsheet are enabled. "Move Up" will move the order ahead. "Move Down" is the opposite; it moves the order down the list. "Exclude" indicates to Sequence Planner that a certain order will not be used in this sequence study. Excluded orders appear in gray in the order details. |
Station Details
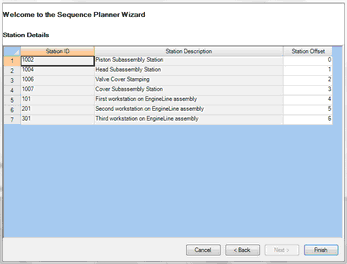
The Station ID and Station Description are pulled from the line balancing scenario which you chose for the study in the Study Details frame. The only information you can change in this frame is the station offset.

Station Details
The station offset specifies the order that work enters the stations. It begins at the station with offset zero, then goes to one, then to two, and so on. You can change station offset values, and it is also allowed to enter the same offset for multiple stations. This accommodates stations that are doing subassembly work and have the same Takt time as the same line. For example, if STN03 is building a subassembly in parallel with work on the main assembly on STN02, they could each have 1 as station offset.
The station offset numbering must begin at 0 and is not allowed to skip numbers.