Assembly Planner can interface with your engineering change system and allow you to manage your engineering changes electronically. The change management system includes Engineering Change Requests (ECRs) and Engineering Change Orders (ECOs) originating from your engineering system. It also creates a Manufacturing Change Order (MCO) to correspond with each ECR/ECO.
Assign an ECO to an ME
Step 1: Go to Library's ECO Editor, and in the search box, type in “%” to search all ECOs, or type in the ECO ID to search for an ECO. You can also search “Pending ECOs” (ECOs still being processed), “All ECOs”, or search by certain ECO properties via “Advanced Find” (see Appendix D).
There are four ECO statuses
1.New – newly coming ECO; has not been assigned to ME.
2.Error – newly coming ECO with an error; has not been assigned to an ME. For example, “the corresponding ECR has not yet arrived.”
3.Pending – the ECO has been assigned to an ME, but the engineering change has not been exported yet.
4.Closed – the corresponding engineering change has been finished and exported to an MRP system.
Step 2: After the search, select an ECO in either new or error status. Right-click and select “Process ECO”; then you will see the “Create New MCO” window shown below.

Create New MCO
Step 3: Choose an ME from the “Assigned To” drop down list to assign this ECO to. Once the ECO is assigned, a corresponding MCO will be generated automatically. An MCO can be re-assigned to another ME before it is promoted to the “Implement” status. In the “Create New MCO” window, “Due Date” is the deadline for the ME to promote this MCO to the next status. “Default From Effective Date” is the date the engineering change will be implemented on the floor. This date cannot be changed after the MCO is promoted to the “Implement” status.
If parts under the ECO you are trying to assign to an ME are also being affected by another pending ECO, there will be a warning message as follows. This message informs you there is a possibility the ECO will be processed out of order.

Warning Message
Engineering Change
Step 1: Search and select the ECO on which the ME wants to make the engineering change
Step 2: Select the ECO, and you will see 4 tabs:
1.“Header” tab – general information about the ECO
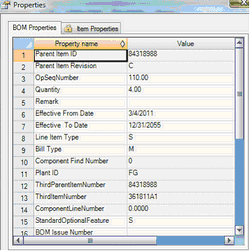
2.“BOM” tab – EBOM information (e.g., Parent ID, Parent Revision, Item ID, Item Revision, Quantity, etc.)
3.“Item” tab – Item Master information (e.g., Item ID, Item Revision, Item Description)
4.“History” tab – view or add change history of the ECO. To see all the change history, check the “Show system generated messages” box.

Figure 4 – ECO BOM tab

Figure 5 – ECO Item tab
Red color indicates a mismatch between the Previous Revision of this part in the ECO and the existing revision of this part in the system. For example, if a part is in rev A in Proplanner and an ECO is indicating a revision change of this part from B to C, this part will be highlighted red in the item tab.
Step 3: Click the parent ID in the BOM tab of the ECO, and the screen will automatically switch to the BOM tab of this parent item.
Step 4: In the BOM tab of the parent item, the LHS is the EBOM, and the RHS is the MBOM. EBOM is a reference when you are making the engineering change on the MBOM side. Different types of MBOM changes are highlighted with different colors to facilitate the engineering change. See the BOM Comparison section for the colors and difference types.
Step 5: To make the change to the MBOM, first Check Out the parent item.
Add – An existing part in the system needs to be added to the MBOM. To make the change, copy the part from the EBOM side and paste it in the MBOM. The effective-from-date will default to the Default Effective Date of the corresponding MCO. To change the effective-from-date, right-click the BOM record and select either “Properties” or “Mass Edit View”. Change the from-date in the pop-up window.
New – a new part needs to be added into both the database and the MBOM. Processing a “New” type of change is exactly the same as processing an “Add” type of change.
Time Out – a part needs to be timed out in the MBOM, but this part will still be used in at least one another MBOM in the system. To process the change, right-click the part and do either “Properties” or “Mass Edit View”, and then change the Effective-To-Date to the desired date to time out this part.
Last Usage – a part needs to be timed out in the last MBOM using this part. Processing a “Last Usage” type of change is exactly the same as processing a “Time Out” type of change.
Quantity Change – a part is undergoing a quantity change in the MBOM. To make the change, copy the EBOM's new item quantity and paste it into the MBOM. Now there should be two records of this part in MBOM with different quantities. Also, the effective-from-date of the newly added record will be default to the MCO default date. Then you need to time out the item record with the old quantity through either “Properties” or “Mass Edit View”.
Rev Change – a part is undergoing a revision change in the MBOM. Revision change is taken care of by the system automatically, and you need not to do anything when rev change is concerned. Basically, there will be a pop-up window asking you to set a rev change date when you are promoting an MCO from release to implement, and all the rev change will be implemented on this rev change date.
If you add a wrong item record to the MBOM and have not Checked In the parent item yet, you can right click the wrong item record and select “Delete” to remove this part from the MBOM. However, once the parent item is checked in, the “Delete” option will be disabled for all existing BOM records. Additionally, for rev change, the system will do a where-used search for the part undergoing a rev change and will change the rev of this part under all MBOMs (not only the MBOM under the corresponding ECO).
Step 6: Once all engineering changes under this MBOM have been handled, do a “Check In All” for the parent item. Then go back to Step 3 until all parent items in the BOM tab of ECO have been handled.
Cancel, Re-assign, and Promote MCO
After all the parent items have been handled, go to the Library and MCO, and click the “Promote” button to promote the MCO through the following statuses: Process, Approve, Release, Implement, Verify, and Complete. Among these 6 statuses, when an MCO is under status “Implement”, “Verify”, or “Complete”, the corresponding engineering change has already been exported from Proplanner to the MRP system.
When promoting MCO from “Release” to “Implement”, you will be asked to set a rev change date. This is the date you want the revision change of the parts under this ECO to be implemented. Before “Implement” status is reached, you can always cancel an MCO by clicking the “Cancel MCO” button. Once the MCO is canceled, all engineering changes made to the MBOMs are removed. In other words, all MBOMs affected by this ECO will roll back to the original status before the ECO was processed. Before “Complete” status, an MCO can always be re-assigned to another ME by clicking the “Re-Assign” button.