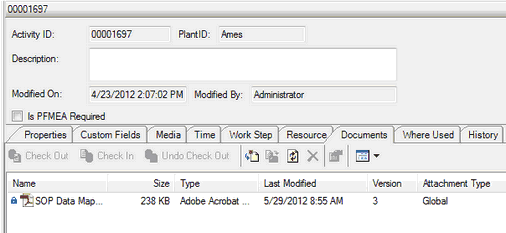
Any documents that should be associated with an activity may be added in the Documents tab within the Activity Editor.

Documents Tab of the Activity Editor
Documents can be imported by using the import button![]() to browse to and select the document.
to browse to and select the document.
Documents can be exported by using the export button![]() to browse to and select the destination for exporting.
to browse to and select the destination for exporting.
The refresh button![]() is used to ensure the most current documents are attached.
is used to ensure the most current documents are attached.
The delete button![]() is used to delete documents from Assembly Planner.
is used to delete documents from Assembly Planner.
The properties button![]() opens a screen containing the basic information of the document (size, type, modified date, etc).
opens a screen containing the basic information of the document (size, type, modified date, etc).
The check out/check in/undo check out buttons can be used to set the status of the document.
When checked out![]() , the document can be opened, edited, and saved (with changes made to the database once the document is checked back in).
, the document can be opened, edited, and saved (with changes made to the database once the document is checked back in).
When checked in![]() , the document can be opened, but changes cannot be made.
, the document can be opened, but changes cannot be made.
If undo checkout is selected![]() , the changes made while checked out are not saved to the database, and the most recent database snapshot is restored.
, the changes made while checked out are not saved to the database, and the most recent database snapshot is restored.
Every time a document is checked in, the number under the Version column automatically increases by one to keep track of how many times the document has been edited.
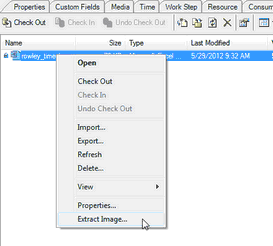
Images can be obtained from PowerPoint presentations or Excel spreadsheets that have been imported in the documents tab. Right-clicking on the desired document brings up a menu with Extract Image at the bottom.

Right-click menu in the Documents Tab with Extract Image as an option
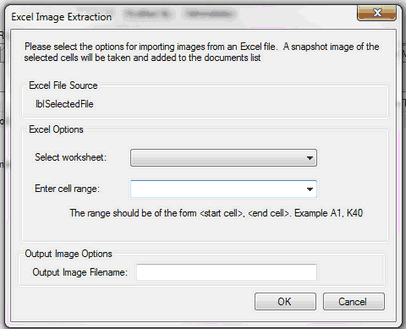
Once Extract Image is selected, a new menu is opened for you to specify what image should be taken. If the image is from an Excel file, a rectangular range of cells must be either defined by the Image Extraction default setting in the General Tab of the Options Menu or entered in the form: [cell in the top left, cell in the bottom right]. If the file is a PowerPoint, the number of the slide from which the image should be taken must be provided. Also, a name for the exported file must be provided.

Image Extraction Window for Extracting Work Instruction Images from Excel and PowerPoint documents
If successful, the image will show up in the documents tab as a JPG with the name provided in the output image filename field.
Images to be displayed in the work instructions should be saved as a document in this tab.