Assembly Planner can be configured to maintain a single revision of an item. This would be used in situations when it is acceptable to always assume that a single (max) revision of an item will be needed for any products.
1. Export BOM from ERP (or PDM system)
2. Within Assembly Planner:
3. Go to Data Management and then select 'Import Data'
-Set Import Type to BOM
-Set Import Mode to Replace
-Set BOM Type to eBOM
-Browse the to Excel file
-Select Import

Import Data
4. Go to Library and select the BOM Changes module
5. Search 'By Date' or 'By Item ID' to create a list of all ParentIDs that have undergone a change
6. Select the ItemID to be reviewed

List of ParentIDs That Have Been Changed
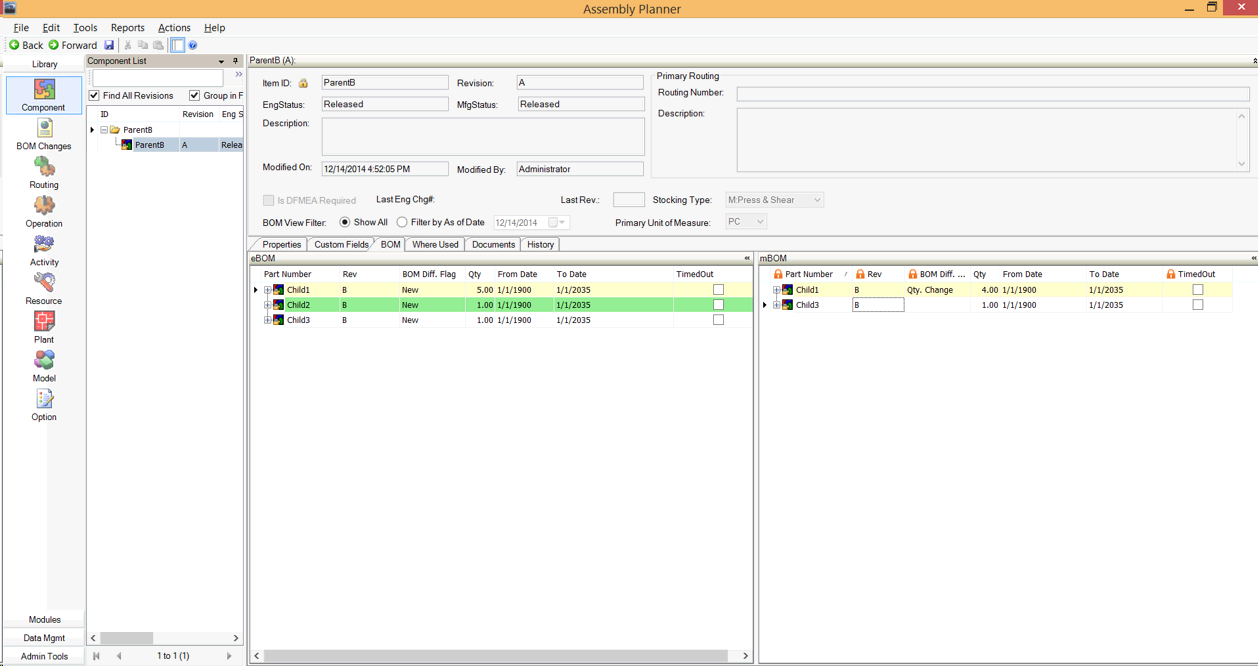
7. After the ItemID has been selected, the Component Library is shown for the ParentID of the item selected on the previous screen.
8. The eBOM to mBOM comparison view is shown automatically. Note that the BOM diff flags only highlight changes to the immediate children of the selected parent item.
See the BOM Comparison page for more information.
Any discrepancies will be highlighted in a color, and each color has a different meaning. You can use the chart below to interpret the meaning of each color. The Diff Type is also displayed in the last column of the eBOM and mBOM view tables.
Color |
BOM Type |
What it Means |
Cyan |
eBOM / mBOM |
Revision Change |
Lemon Chiffon |
eBOM / mBOM |
Quantity Change |
Peach Puff |
eBOM |
Part is new to database and has been added to the eBOM |
Light Green |
eBOM |
Part that already exists in database has been added to the eBOM |
Light Pink |
mBOM |
Part should be removed from or timed out in mBOM (no longer exists in eBOM) |
Light Grey |
mBOM |
Part should be removed from mBOM, no other usages of this part in the database |
9. Select the BOM Changes module again
10. Review the remaining ParentIDs that do not have the checkbox for 'Is BOM Applied' checked
11. Highlight (select) all rows that have been reviewed and then select 'Apply BOM'.
12. A warning message will be displayed before the Apply BOM function completes. Select Yes if you are ready to proceed.
13. All consumption records which meet selection criteria will be automatically updated. The remaining mBOM records will need to be consumed manually. The selection criteria is based on system preferences, but it typically means that things such as automatically bumping the consumed parts revision level.

Warning Message
14. If the activities within the process routing have already been defined, then next step to consume the parts from the mBOM is to use the Consumption Workbench.
From the menu bar at the top of the application, select Tools then Consumption Workbench
15. Click Add to select the routing(s) to be updated
16. Click Add From Library
17. Search for the ParentID that underwent a change
18. Select the item from the list. Continue adding all of the items that underwent a change.
19. Select OK

Workbench Input

Component Search
20. Select the appropriate filters for the workbench.

Workbench Input