The Deviation Module allows a privileged user to define and submit Deviations into Assembly Planner and trigger an approval workflow that will track the implementation of the Deviation. Deviations are created and managed in the Deviation module, while the workflow is tracked in the MCO module, similar to ECO or MCO workflows.
To begin, navigate to the Library > Deviation Module

Deviation Module is found on the left-side panel
Here you can search for all Deviations using the search control as shown below or specify a specific Deviation ID and search.

Search Control
Deviations will be grouped into 4 categories:
Complete: when all Life Cycle Stages of the Deviation Workflow are completed, the Deviation Status will change to Complete, utilize the Search Completed Deviations checkbox to include completed deviations.
In-Process: Deviations which have a workflow started but not completed will have a status of In Process, Deviations may be processed once a User is ready to trigger the Deviation workflow.
New: newly created Deviations which have not been Processed (and do not have a workflow started) will have a status of New. Users will create a Deviation, providing basic details such as a unique ID, Description, Dates, and Deviation Type. Once created they will be able to add documents and items before processing the workflow.
Void: Deviations that are found to be not necessary or not required may be marked as Void, only Deviations in the New status may be marked as Void, once a Deviation is Void it cannot be Processed. Once a Deviation is processed, in may not be Voided.

Deviation categories: complete, in-progress, new, and void
Creating a Deviation
Right Click in the search control window and select Create New Deviation…

Right-Click to Create a New Deviation
Fill out the “Create New Deviation” screen:
1.First provide a Deviation ID. This can be entered manually or Auto Generated using the Generate ID button. Using the Generate ID button will auto increase the IDs based on the last created Deviation ID, ensuring no duplicate IDs.
2.Next enter a description of the Deviation change.
3.Set the Effective From and To Dates that will represent the duration of the Deviation and automatically set the Status of a Deviation, the Status will be:
a.“Active” if today’s date is within the effective date range
b.“FutureEffective” if today’s date is prior to the From Date
c.“Expired” if today’s date is beyond the To Date
4.Properties – the list of properties is customizable by customer and can be used to provide relevant and standard details required when entering a Deviation into the system
5.Press OK and the Deviation will be available in the search control window

Deviation Search Control Window
Select the Deviation to view the ID, Status, Description and Header properties defined from above.

Selected Deviation Properties
Additional tabs
Items: use the Items tabs to associate Parts from the Component Library for which the Deviation impacts

Items Tab
To add Part(s) from the BOM, click the “Add From BOM” button in the bottom right
Search for and select Part(s) to associate them to the Deviation
The search tool uses a tree structure to display the child components of a selected parent, you can add parts from either the eBOM or MBOM.

Search Tool
The Where Used tab in the Select BOM Items window is used to find parent components for a known child item. It is very useful in cases where one part number is known, but where it is used is not.
In the Where Used tab, search the known part and everywhere it is used will be displayed. This is the opposite of the BOM tab, as it shows higher level parts rather than lower level parts.
You can also add parts from either eBOM or mBOM in the Where Used tab.

Adding Parts in the Where Used Tab
Select Add from Library to search for a specific component and associate it directly to the Deviation

Add From Library Button is Located in the Bottom-Right of the Tab
Use the Auto Build Model Option Mapping function to auto populate the Models and Options associated to the Parent-Child from the MBOM. Refer to this section of the manual for more details on this routine.

Auto Build Model Option Mapping
Select the Edit Model Option Date button to manually add Models or Options to the selected Item row

Add Models or Options
Select the Add Model or Add Option to search for and add specific models or options to these fields

Edit Model Option Data

Documents
Attach files, images and reference materials via the Documents Tab. All files attached will be visible for all users linked to the workflow for the Deviation. Import, Export or Delete documents using the menu items.

Document Details

Document Properties
History
The History tab will display system generated messages such as when a Deviation is created or Select Add… in the bottom right hand corner to manually add a message to the History. If a History record has been added, select Edit to append the existing message.

History Tab
Process a New Deviation
When the Deviation is fully defined, right click the Deviation in the search control and Process it to kick off an MCO workflow.

Right-Click to Process Deviation
You will now see the Create New MCO screen which is common between the ECO and MCO modules for creating a workflow. The workflow drop down in the upper right will be populated with pre-defined workflows specific to a Deviation. Once the workflow is created, it may be processed in the MCO module as if it were an ECO or local MCO workflow.

Created New MCO Screen
The Deviation will now be moved to the InProcess folder in the Deviation screen.

InProcess Folder
The created workflow can be found in the MCO module by searching for the Deviation ID. A blue hyperlink in the header will take you directly to the Deviation to reference details or documents.
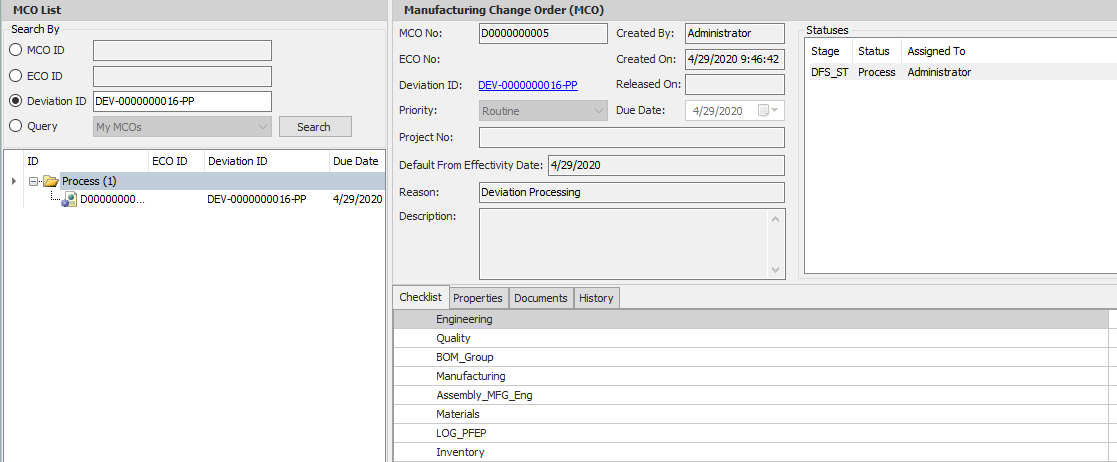
The workflow will now be processed within the MCO module until all Life Cycle Stages are complete. When complete, the Deviation will move to the completed folder in the search control.
“Refer to MCO Module for workflow processing”