Most spreadsheet views in Assembly Planner offer basic sort and filter features for each column in the spreadsheet. You can choose to sort and display rows in the spreadsheet in ascending or descending order based on the column you are sorting. You can do this by clicking on the up and down arrows in the column header. You can also filter row data by clicking on the funnel icon in any column header and selecting an entry to view all occurrences of that entry.
Note that you can switch back and forth between editors and your filtering should remain on those spreadsheets that you filtered. However, if you refresh or reopen a process, the filtering will be cleared and you will see all entries.
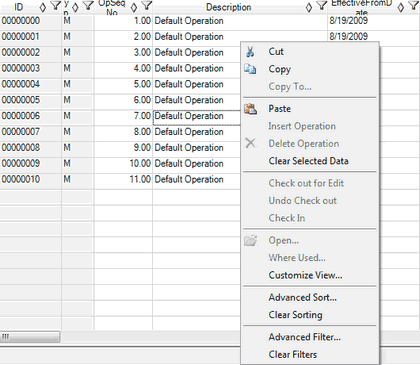
In addition, the Routing Editor, Operation Editor, and Activity Consumption tab have advanced sort and filter features. The Line Balancing task list also has the advanced filter capability. To access these features, right-click anywhere on the spreadsheet and select the desired menu option (Advanced Sort, Clear Sorting, Advanced Filter, or Clear Filters).
Note: You can use the basic and advanced features at the same time. For example, if you set a basic sort on a column, when you open the Advanced Sort window, you will see the basic sort item already in the list.

Worksheet Displaying Right Click Menu with Advanced Sort and Filter Options
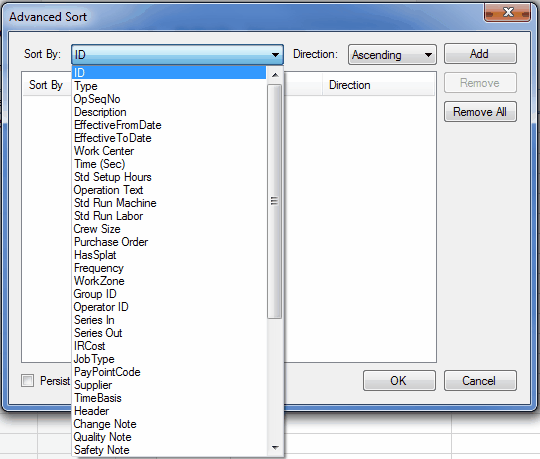
To use the Advanced Sort, right-click and select Advanced Sort; then select a field name in the Sort By Drop-down. The field names are displayed in the same order in which they appear in your spreadsheet. Then select a Direction - either Ascending or Descending. Click on 'Add.' You can add or remove as many Sorting criteria as you wish.
If you select the 'Persist Sorting' checkbox, your sorting criteria will still apply when you switch to other spreadsheets. (If you are setting sorting options in the Routing Editor, you can switch back and forth between routings and your settings will remain. If you are setting sorting options in the Consumption tab, you can switch between activities and your consumption sorting settings will remain.) Note: These settings are session-based, so when you close and re-open the application, they will be cleared.
To clear a sorting, you can either open the Advanced Sort control and click the "Remove All" button, or you can right-click on the spreadsheet and select Clear Sorting. All entries in the spreadsheet will now return to the default order.

Advanced Sort Menu Displaying Selected "Sort By:" Criteria for the Routing worksheet
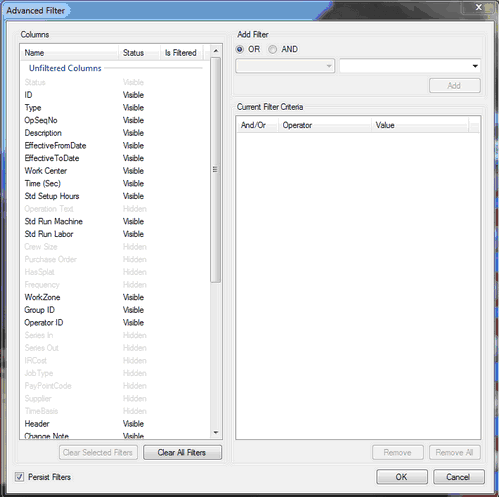
To use the Advanced Filter, right-click and select Advanced Filter; then select the column name you wish to filter. The list of column names shows the order in which your columns appear in the spreadsheet (and whether they are visible or hidden). If you would like to filter by a hidden column, you must first exit out of the Advanced Filter window and edit your Customize View settings.

Advanced Filter Window
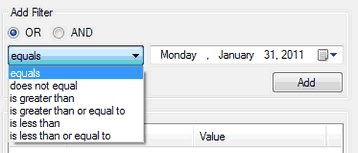
Once you have selected the column name, you can add a filter for that column. Select the appropriate criterion from the filter drop-down menu and click Add. The following images show the menu you will see for each field type. If you are adding multiple filters for the same column, make sure to use the OR and AND radio buttons to indicate the relationship between filters. As with Persist Sorting, the Persist Filters checkbox indicates whether you want your filters to remain even as you switch back and forth between spreadsheets. Note: These settings are session-based, so when you close and re-open the application, they will be cleared.

Advanced Filter - Alphanumeric Field

Advanced Filter - Numeric Field

Advanced Filter - Checkbox Field

Advanced Filter - Date/Time Field
To clear the filtering, you can use the clear or remove buttons in the Advanced Filter window, or you can right-click on the spreadsheet and select Clear Filters.