To get started with a PFMEA, click the "Select" button in the PFMEA header. This will bring up a window that allows you to search for the operation, activity or routing to perform the analysis on. When you are searching for an operation or activity, you will first need to select the correct routing. Make sure you open the editor by clicking the "Edit" button at the bottom right of the screen.
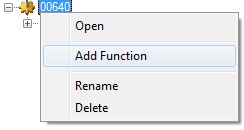
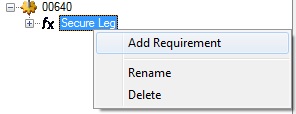
When working with tree control, new functions, requirements, failure modes, effects of failure, and causes of failure are added by right-clicking on the next higher item in the tree. For examples, see the screenshots below. The screenshots above show a PFMEA for activity 00640, which requires the assembler to attach a leg to the chair base. In the tree view, a right-click on the activity icon allowed the engineer to add the function line and label it "Secure leg". After this, he moved on to adding a failure mode.

Right-Click on Activity 00640

Right-Click on Activity Secure Leg to Add Requirement
Tree Control Icons
![]() Function
Function
![]() Requirement
Requirement
![]() Failure Mode
Failure Mode
![]() Effect of Failure
Effect of Failure
![]() Cause of Failure
Cause of Failure
Functions (Adding, Renaming & Deleting)
1. Click on the FMEA (Root Node) for a Process.
2. Hit the Edit Button and then right-click on the selected node.
3. Select Add Function menu, this adds the Function tree node.
4. To change the name of the function, right-click and select Rename.
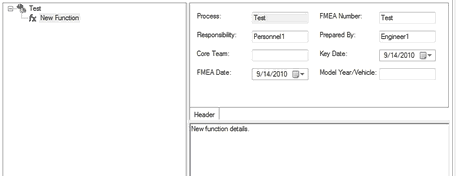
5. To add details to this function, type in the given fields or the empty text box below the Header. Note: The header information remains the same regardless of which node you have selected.
6. To delete the requirement, right-click and select Delete.

FMEA New Function
Requirements (Adding, Renaming, & Deleting)
1. Right-click on the desired function node.
2. Select Add Requirement; this will add the new Requirement tree node.
3. To change the name of the requirement, right-click and select Rename.
4. To add details to this requirement, type in the empty text box below the Header.
5. To delete the requirement, right-click and select Delete.
Failure Modes (Adding, Renaming & Deleting)
1. Right-click on the desired requirement node.
2. Select Add Failure Mode; this will add the new Failure Mode tree node.
3. To change the name of the failure mode, right-click and select Rename.
4. To add details to this failure mode, type in the empty text box below the Header.
5. To delete the failure mode, right-click and select Delete.
Effect of Failure (Adding, Renaming & Deleting)
1.Right-click on the desired failure mode node.
2.Select Add Effect of Failure; this will add the new Effect of Failure tree node.
3.To change the name of the effect of failure, right-click and select Rename.
4.To add details to this effect, type in the empty text box below the Header and RPN tabs.
5.Click on the RPN tab; you can now assign a severity value to effect. Click on the button next to the severity and select a rating. Once the rating is selected, click on the OK button.

FMEA RPN Tab
6.To delete the effect of failure, right-click and select Delete.
Cause of Failure (Adding, Renaming & Deleting)
1. Right-click on the desired Effect of Failure node.
2. Select Add Cause of Failure; this will add a new Cause of Failure tree node.
3. To change the name of the cause of failure, right-click and select Rename.
4. To add details to this cause of failure, type in the empty text box below the Header and RPN tabs.
5. Click on the RPN tab; you can now assign an occurrence frequency for that cause. Click on the button next to the occurrence and select a rating. Once the rating is selected, click on the OK button.

FMEA Edit Occurance
Process Control Editing
1. Once you have added a cause, Process Control (Prevention), Process Control (Detection), Recommended Control, and Action Control are automatically added.
2. Click on Process Control (Prevention) and type in the prevention description in the empty text box below the Header and RPN tabs. The Occurrence rating in the RPN tab can also be edited when the Prevention node is selected.
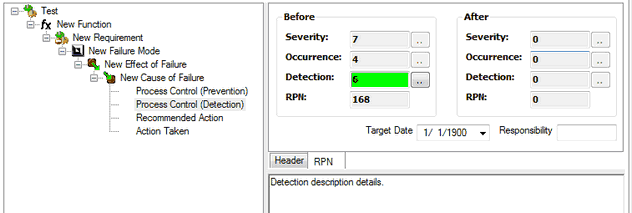
3. Click on Process Control (Detection) and type in the detection description in the empty text box below the Header and RPN tabs.
4. Click on the RPN tab; you can now assign a detection value for that control.
5. After adding the detection value an initial RPN is calculated and displayed in the RPN text box under “Before”.
Note: RPN or the Risk Priority Number is a product of the Severity, Occurrence and Detection values.

FMEA Detection
After Analysis
1. The final step in FMEA is the After Analysis. This is done by defining the recommended action and the action taken.
2. Once the process control has been defined, click on Recommended Action, and then Action Taken.
3. You can assign new severity, occurrence, and detection values for these changes; this is done in the after section of the RPN tab.
4. The rating tables are the same for both after and before, the objective is to lower the RPN in the after analysis.
5. Hit the save button and OK to save all the changes.

FMEA After Analysis Recommended Action