You can generate the Job Element Sheet to view and print from four different locations in Assembly Planner. Each time you generate a report, you will be prompted to set Filter Criteria.
The Job Element Sheet is designed to meet the following parameters:
1. A3 paper size with 0.5 inch margins and landscape orientation
2. 2 activities per 'header' page (1st page for a new Station-OperatorID combination) and 4 activities per follow-up pages
If the Job Element Sheet is run from the Routing, Operation, or Activity level, the report will select the line balance scenario file which has the nearest Scenario-Target Date prior to the Effective Date used to filter the report. If no Effective Date filter is used then the current date will be used. If the Job Element Sheet is run from the Report Manager in the Line Balancing Module then the selected scenario file will be used.
Once a scenario file has been selected, the report will pull information from the scenario and calculate certain fields:
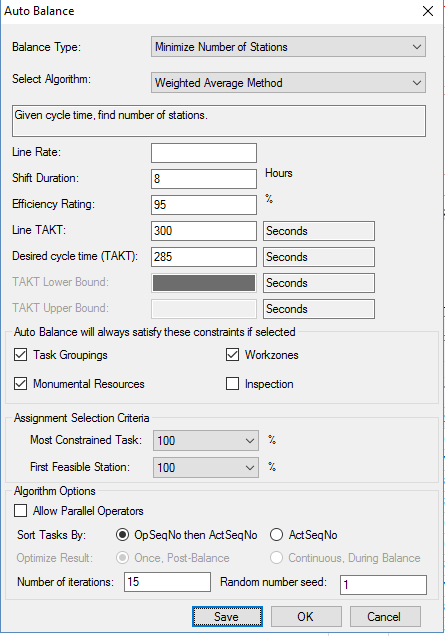
Takt Time - Line Takt (Line Balance - Auto Balance)
JPH (Net) - 3600 / Takt Time (Calculated Field. Takt must be in seconds)
Efficiency Factor - Efficiency Rating (Line Balance - Auto Balance)
Line Cycle Time - Desired cycle time (TAKT) - (Line Balancing - Auto Balance. Line Takt * Efficiency Factor)
JPH (Gross) - 3600 / Line Cycle Time (Calculated Field. Takt must be in seconds)
No. of Activities - Count of the number of activities at the Station-OperatorID which passes the report filter criteria
Effective Date - Report filter criteria. If no date is selected the current date will be used.
Each page footer will show the current page vs total pages, Assembly Planner user name who printed the report, and the date/time the report was generated.
Routing
1.Select a Routing and then click on the Reports menu.
2.Select the Work Instructions Report.
3.Set the filter criteria and click 'OK.' The Job Element Sheet will be generated for each operation in the routing including all the details for activities under that operation. The activities are sorted by OperatorID within each work station.
Operation
1.Select an Operation and then click on the Reports menu.
2.Select the Work Instructions Report.
3.Set the filter criteria and click 'OK.' The Job Element Sheet will be generated for each activity in the routing.
Activity
1.Select an activity and then click on the Reports menu. *Note: you must first search for the activity within a Routing.
2.Select the Work Instructions Report.
3.Set the filter criteria and click 'OK.' The Job Element Sheet will be generated for each activity in the routing.
Line Balancing
1.Go to File and Open Scenario or New Scenario (create scenario then go to step 3)
2.Select the desired Scenario and hit Open
3.Click Reports and Select Report Manager
4.Select Station Work Instructions Report and Set the filter criteria and click 'Generate.' (Below is the Report Manager Window). The Job Element Sheet will be generated for each activity in the routing.

Report Manager With Filters