Assembly Planner user details can be created, edited, and removed by Administrators in the Users Editor, located within Admin Tools. ![]()
The User Editor
After selecting the User Editor, the administrator will see a list of current user accounts. The user name and role are displayed first. Other information includes whether the account was created by the Assembly Planner system (IsSystemAccount column) or whether a user created the account. The default plant for each user, user's full name, and email address are optional but recommended entries.
Add: Click this button to add a new user account.![]()
Delete: Select an existing user account from the list and click this button at the bottom of the screen, to remove the account. That user will no longer be able to sign into Assembly Planner. ![]()
Edit: Select an existing user account from the list and click this button to edit a property of the user's account, except the user-name. If the user-name must be changed, the existing account should be removed and a new one added. ![]()
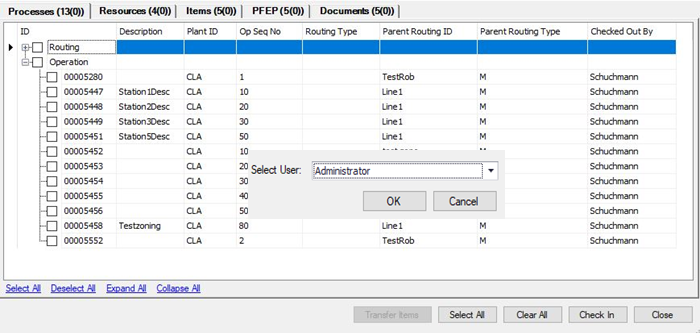
View Checked Out Entities: By clicking at this button, you can view all entities the user has checked out. A window will pop up which will include the following tabs: Processes, Resources, Items, Plan for every part (PFEP) and Documents.

Window Popup with Users


Checked Out Entities
From here, you can select entities and check them in. This should only be done if you are sure the user has completed their changes, since this will save any of their changes to the database.
The second function is Transfer Item(s), which can be used if the checked-out entity (process, resources, or parts,etc) needs to be transferred from one user to another. This is helpful if User A has something checked out that User B needs to check out. Select one of the entities and select the item in that entity you want to transfer to another user.Click on Transfer item and a window should pop up giving the a list of all the potential users the item can be transferred to. Make sure you select the right item and the right user as the changes will be saved to the database.
Note: Documents may also be transferred but it will only transfer the last checked in copy of the document. Any changes made by users with documents checked out will be lost.
User Name: The specific name that the user has to sign into Assembly Planner
Role: The role that is given to the user. This helps determine what the user can and cannot see or edit. This can be broken down in Roles.
Is System Account: If the user was already set by the system, then this would be "Yes"; if this person has been added to the system, then this would say "No".
Default Plant: Tells the plant where the user is located.
Full Name: Full name of the user.
Email: Email of the user.
Domain Account: Specifies if the user is a local account ('Assembly Planner Authentication') or a domain account ('Windows Authentication').
Domain: For domain accounts, the domain of the use. Entered in the form domain\username.

Edit User Information