One basic user interface is common throughout the library, even though each portion has slight differences. There is a search control and search list, a header containing summary information, and a worksheet-like area with several tabs. Below is a screenshot of the Routing Editor with the areas labeled.

Auto Hide for Lists
Notice that at the top of the search control there is a button that looks like a push pin. This is the Auto Hide function, which appears in many of Assembly Planner's editors and modules. Auto Hide gives the option to display or hide certain lists.
When the Auto Hide button's push pin is vertical, it means the information is 'pinned down' to the screen and will be displayed. Clicking on the button releases that area of the screen to automatically hide when it is not in use (i.e., when the mouse is not hovering over it).
When Auto Hide is on, a horizontal push pin is displayed ![]() and that portion of the screen will hide in a tab near the navigation pane. Click on the tab to display the information again.
and that portion of the screen will hide in a tab near the navigation pane. Click on the tab to display the information again.
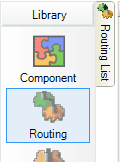
The Routing List is 'Hidden' in the tab.
Hiding the Header
Many other features, especially headers, can be hidden as well. Click on the hide button ( ![]() ) to do this.
) to do this.
The entire header area will be collapsed into the title bar. Click on the expand button to display the data again.
The entire header area will collapse into the title bar. Click the expand button ![]() to display the data again.
to display the data again.

Hide the Header information using the Hide Button
![]()
The Header will collapse
Split Screen Worksheets
Assembly Planner's split screen feature allows multiple areas of a worksheet to be viewed at once.
Assembly Planner has a split screen feature that allows multiple areas of a worksheet to be viewed at one time.
When the mouse is hovered at the far left side of the horizontal scroll bar, the icon will change to a black bar with horizontal cross-arrows (![]() ). Clicking and holding the left mouse button will cause a dark vertical line to appear on the worksheet. If the mouse is dragged to the right, a split screen will be created when the mouse button is released.
). Clicking and holding the left mouse button will cause a dark vertical line to appear on the worksheet. If the mouse is dragged to the right, a split screen will be created when the mouse button is released.
When the mouse button is released, the screen will be split. Each portion of the screen has its own horizontal scroll bar. This helps if a particular field needs to be displayed while work is done in columns far to the right of the worksheet.

Split Screen Routing worksheet
To remove the split screen, simply grab the split bar and drag it all the way to the left of the screen. It will disappear and you will again only see one spreadsheet.

Removing the split screen by clicking and dragging the split screen bar to the far left of the worksheet