Scheduler is an application within the Assembly Planner software which allows for the scheduling of orders throughout a calendar year. Calculations based on production constraints allow for effective and efficient scheduling.
1.To begin scheduling, go to Modules and click on the Scheduler ![]() button.
button.
2.Select the desired Assembly Line on the upper left hand side.
3.Choose the Start and End Dates for the desired date range you want to schedule.
4.Click the Populate button to show the orders and current schedule within the selected date range.
![]()
Scheduling Orders
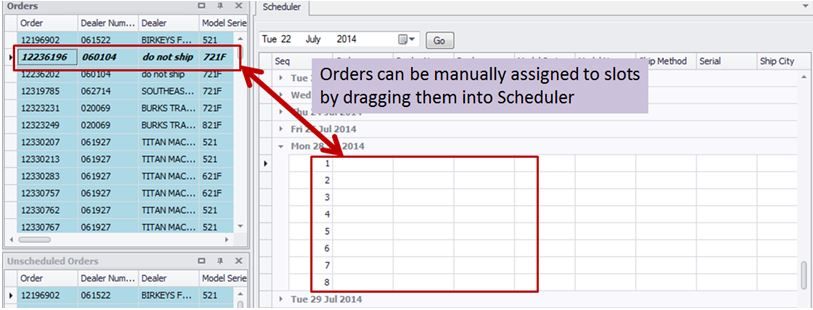
In the layout, any unscheduled orders will be shown in the Unscheduled Orders window as well as the Orders window. In order to schedule an order(s), automated scheduling or manual scheduling can be used.
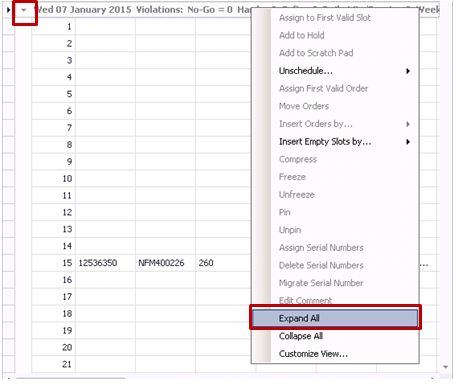
5.To manually schedule an order, first expand a day in the schedule by selecting the arrow on the left or by right clicking on a date and selecting Expand All.
Note: Multi-selecting orders allows you to schedule multiple orders at once.
6.Select an order. A single order can be selected, or multiple orders can be selected by holding Shift or Ctrl. If an order is selected and Ctrl + A is selected, all orders in the window will be selected.

7.Drag the order to the desired slot in the schedule, and drop them there.
8.To automatically schedule an order, select the order, right click and select Assign to First Valid Slot. Note: Multi-selecting orders allows you to schedule multiple orders at once.
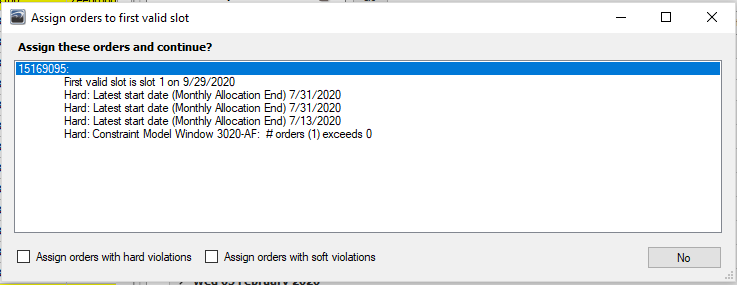
9.A popup will display to show where the orders will be scheduled and any constraint violations that will occur.
10. In the lower, left corner of the popup, there will be two boxes that say ‘Schedule Hard Violations’ and ‘Schedule Soft Violations’. If these are unchecked, the program will not schedule orders that have Hard Violations or Soft Violations.
11. Selecting Yes will schedule the orders on the dates described. Selecting No will cancel the assignment.
Editing the Schedule
Once an order has been scheduled there are several changes that can be made to the order. Note: Multi-selecting orders allows you to change the schedule for multiple orders at once.
12. To unschedule an order, select an order and drag it into the Unscheduled Orders window. Alternatively, an order can be unscheduled by selecting it, right clicking, then selecting Unschedule Selected Orders.
13. To reschedule an order, select an order in the schedule and either drag it to another slot or right click and select Assign to First Valid Slot.
14. To freeze an order, select an order, right click, and select Freeze. This will lock an order in place in the schedule. This can also be used to upgrade the status of the order. To unfreeze an order, select an order, right click, and select Unfreeze.
15. To pin an order, select an order, right click, and select Pin. Pinning an order will lock it in place in the schedule, but won't upgrade the order status. To unpin an order, select an order, right click, and select Unpin.
16. To assign a serial number to an order, select an order, right click, and select Assign Serial Number. To delete a serial number assigned to an order, select the order, right click, and select Delete Serial Number. To move an assigned serial number from one order to another, select the order with the serial number, then right click on the order where the serial number will be assigned and select Migrate Serial Number.
Setting Constraints
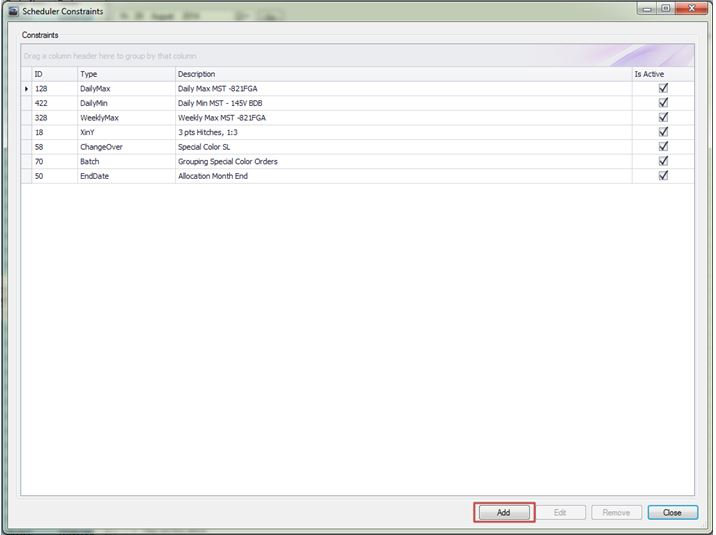
17. To view the constraints, click the Actions menu and select Edit Constraints.
18. Click Add.
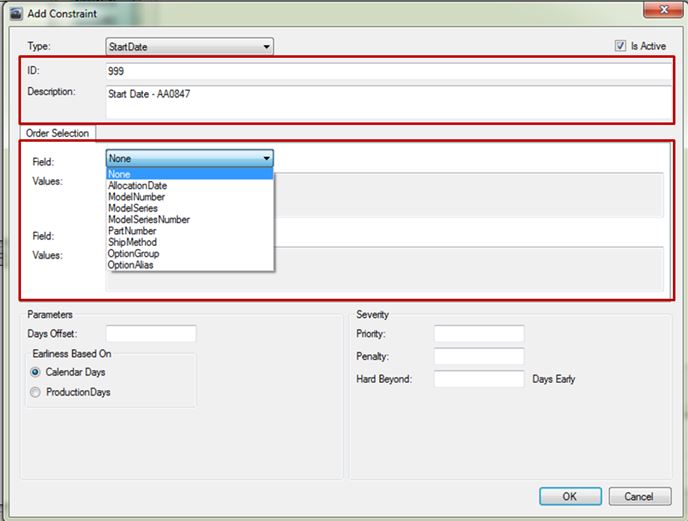
19. Select the Type. For details on each constraint type, visit the Add/Edit Constraints section of this manual.
20. Enter an ID and Description for the constraint.
21. If the constraint only applies to some orders, define these orders within the Order Selection section by entering values in the Field and Value areas.
22. Determine values for the Parameters and Severity sections and click OK. The fields within these sections varies, depending on the constraint type.
For more information on the Scheduler module, see the Scheduler section of this manual.