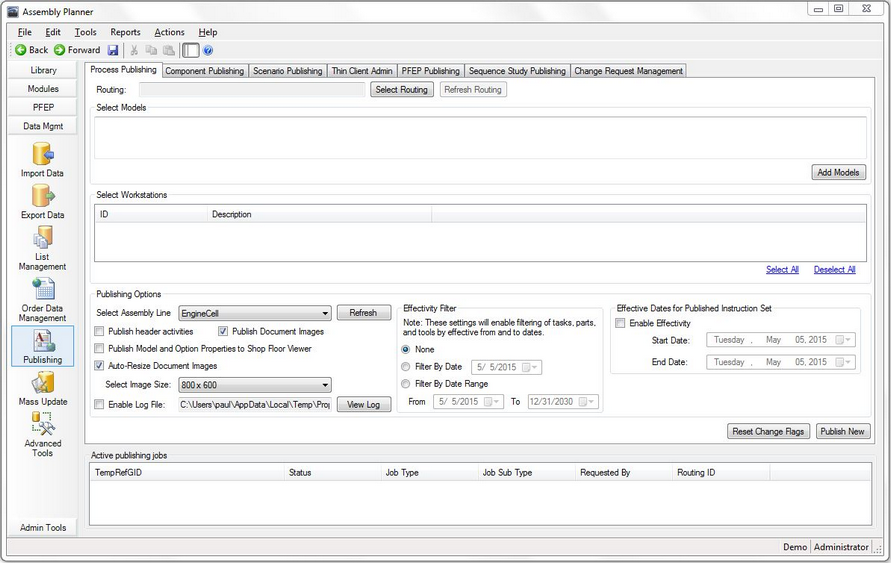
Process Publishing is used to publish work instructions to the Shop Floor Viewer.

Process Publishing
1.Select Routing opens a search window that allows you to choose the routing you wish to publish.
2.Select Models by clicking on the Add Models button and using the search window. Model IDs may also be typed manually, using a comma-separated list. Only work instructions for the selected models will be published.
3.Select Workstations to indicate which specific stations will have instructions published. This feature means you can choose to only update the stations where work instructions have changed. Note: Depending on system preferences, you may be required to publish all stations every time.
4.Select Assembly Line to specify the assembly line on the Shop Floor Viewer from which the new work instructions may be viewed.
5.Publish header activities is a choice that tells the publishing tool to look for and publish activities marked 'IsHeader'. This is a process that is unique to a few users and templates; in general, this box should not be checked and may be disabled completely.
6.Publish Document Images is used to publish all documents in the Documents Tab of an activity to the shop floor viewer. This is not applicable to all shop floor viewer templates; if you were not instructed to check this box during Assembly Planner training, you may leave it unchecked.
7.Publish Model and Option Properties to Shop Floor Viewer is enabled to publish detailed model and option data (description, alias ID, etc.) This is not applicable to all shop floor viewer templates. If your template does display these details, it still is not necessary to publish them every time work instructions are published (since they don't often change). Leaving this box unchecked will increase publishing speeds.
8.Auto-Resize Document Images allows you to choose the size of the published instruction (800 x 600, 1024 x 768, 1280 x 720, etc.)
9.Enable Logging allows you to create a log file to track what instructions are published and when. If a log has previously been created, you can view the existing log before the new instructions are published.
10.The Effectivity Filter allows you to determine what data gets published to the Shop Floor Viewer.
| Selecting None means to include all instructions in the publishing, ignoring any effectivity dates set on individual operations or activities. |
| Selecting Filter By Date and selecting a date means to include instructions for activities who are effective as of the selected date (Activity Effective From Date the same or earlier and Activity Effective To Date the same or later than selected date.) |
| Selecting Filter By Date Range and selecting two dates means to include instructions for activities who are effective between the selected dates. (Activity Effective From Date the same or earlier and Activity Effective To Date the same or later than selected date.) |
11.Enable Effectivity under Effective Dates for Published Instruction Set allows you to publish work instructions that will only be displayed for a certain period for time. Selecting Start and End Date under Enable Effectivity will determine on what date a work instruction set will first be available on the Shop Floor Viewer, and after what date it will be no longer available. This allows you to publish changes prior to implementing them on the floor. This instruction set effectivity setting should be used in conjunction with the Effectivity Filter, which still determined what is actually published.
Click on the Publish New button when you have made all the appropriate settings to publish the new instructions.